Mastering the Art of a Simple Whole Roasted Chicken
Few dishes evoke the same sense of comfort and satisfaction as a perfectly roasted whole chicken. The aroma alone can transform your kitchen into a welcoming haven. Yet, for many home cooks, the idea of roasting an entire bird can seem daunting, conjuring images of complex trussing and endless basting. Good news: it doesn't have to be! This article will guide you through creating an easy roasted whole chicken with impossibly crispy skin and incredibly juicy meat every single time, proving that homemade is not only achievable but often superior to anything you can buy.
Forget the dry, bland rotisserie chickens from the supermarket. With just a few straightforward steps and a reliable technique inspired by culinary experts, you’ll unlock the secret to a succulent bird that will impress your family and friends. This isn't just a recipe; it's a foundational skill that will serve you well for countless meals to come. Our focus is on demystifying the process, making a simple whole roasted chicken a regular, healthy, and delicious part of your culinary repertoire.
Why Homemade Beats Store-Bought Every Time
Once you taste the difference, there's no going back. Homemade roasted chicken offers unparalleled flavor, freshness, and control over ingredients. You dictate the seasonings, the quality of the chicken, and the exact moment of perfection. The result? A bird bursting with flavor, from its golden, herbaceous skin to its tender, falling-off-the-bone meat. Plus, the delightful pan drippings are a treasure trove for making a quick, delectable gravy – a bonus you simply don't get with pre-cooked options.
Essential Ingredients for Unforgettable Flavor
The beauty of this simple whole roasted chicken recipe lies in its minimal yet impactful ingredient list. You likely have most of these pantry staples already, proving that extraordinary flavor doesn't require exotic items.
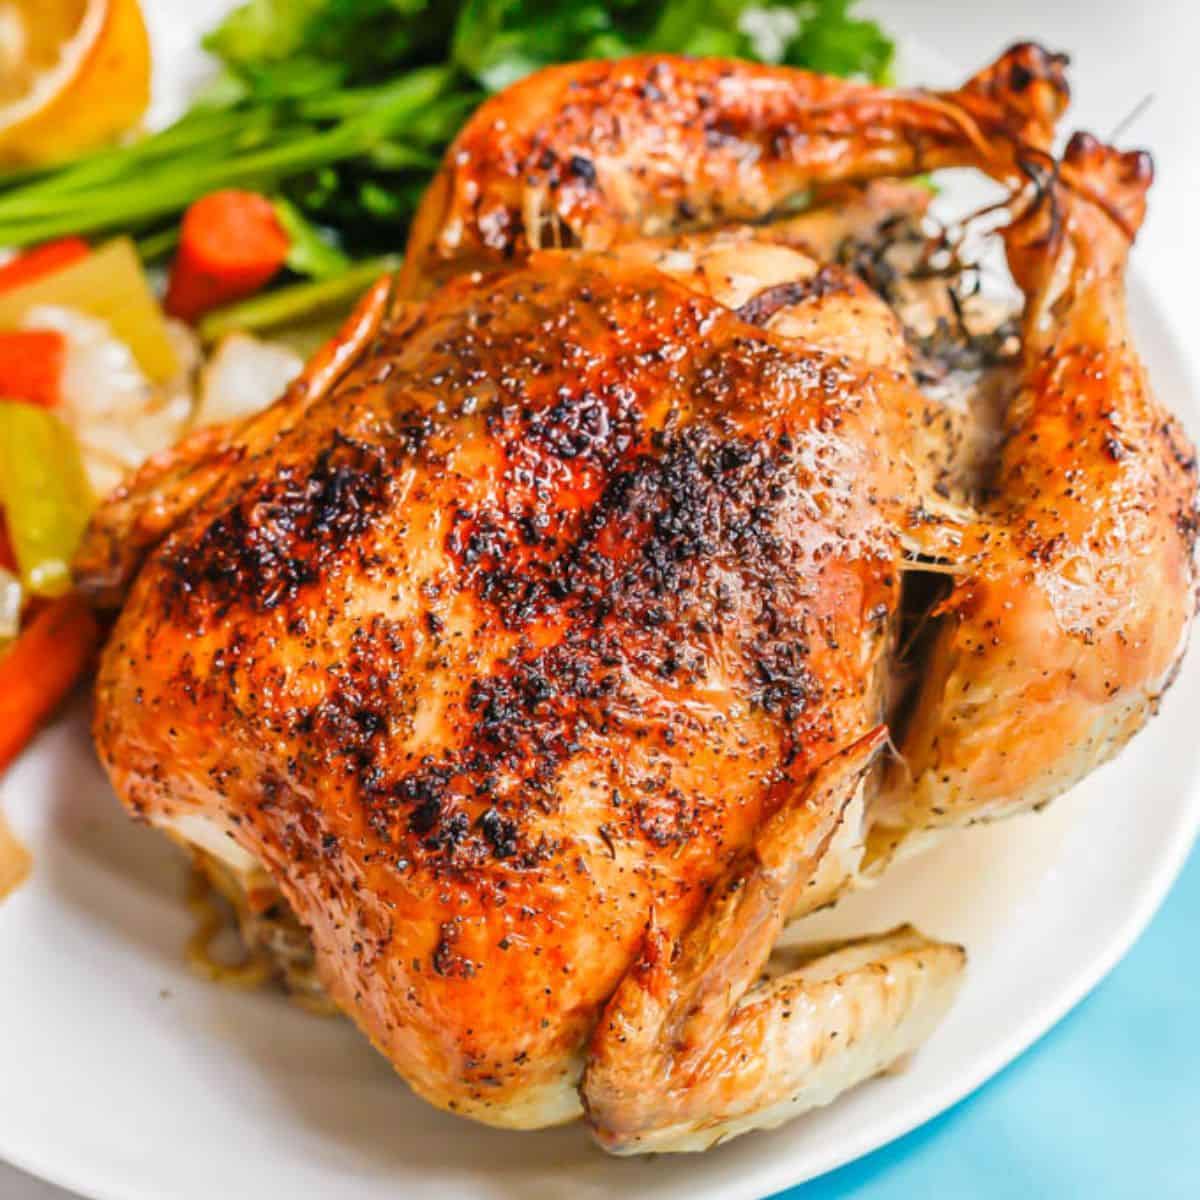
- Whole Chicken: The star of the show! A 4 to 5-pound chicken is ideal for its cooking time and manageable size. Look for good quality, ideally free-range or organic, if your budget allows.
- Fat: Melted unsalted butter is our top recommendation for achieving that rich golden-brown, crispy skin and enhancing flavor. Olive oil is a suitable alternative for a lighter touch.
- Seasoning Blend:
- Kosher Salt & Freshly Ground Black Pepper: Non-negotiable basics. Don't be shy; generous seasoning is key to flavor.
- Paprika: Adds a beautiful reddish hue to the skin and a subtle, earthy sweetness.
- Italian Seasoning: A convenient blend of dried herbs like oregano, basil, thyme, and rosemary that packs a punch.
- Garlic Powder & Onion Powder: For an all-around savory depth.
- Lemon Pepper Seasoning: A fantastic addition for a bright, zesty kick.
- Aromatics for the Cavity: These infuse the chicken from the inside out.
- Lemons: Halved or quartered. Their acidity helps tenderize and brighten the flavor.
- Garlic Cloves: A few smashed cloves add a wonderful pungency.
- Fresh Herbs: Sprigs of rosemary, thyme, or sage are perfect. Use what you have on hand – a little goes a long way.
- Optional: A cup or so of chicken or vegetable broth for the roasting pan to keep things moist and contribute to gravy.
The Right Tools for the Job
While you don't need fancy equipment, a roasting pan with a rack is highly recommended. The rack elevates the chicken, allowing air to circulate evenly around the bird and preventing the bottom from getting soggy. This is a crucial step for achieving consistently crispy skin on all sides. And perhaps the most vital tool of all? An instant-read meat thermometer. This is your ultimate safeguard against dry, overcooked chicken and ensures food safety.
Step-by-Step Guide to Your Perfect Roast
This method focuses on simplicity and scientific principles to guarantee delicious results. It's a game-changer for anyone looking for a foolproof oven roasted chicken experience.
- Prepare the Chicken:
- Preheat your oven to 425°F (220°C).
- Remove the chicken from its packaging and take out any giblets or neck from the cavity. Pat the chicken extremely dry with paper towels, inside and out. This step is non-negotiable for crispy skin!
- Place the chicken on a rack in your roasting pan.
- Stuff the cavity with the halved lemons, smashed garlic cloves, and fresh herb sprigs.
- Season and Coat:
- In a small bowl, melt 2-3 tablespoons of butter. Brush the melted butter generously over the entire surface of the chicken. Don't miss any spots!
- In another small bowl, combine your seasoning blend (salt, pepper, paprika, Italian seasoning, garlic powder, onion powder, lemon pepper). Sprinkle this mixture liberally over the chicken, ensuring an even coating. Gently pat it into the skin.
- Optional: If you wish, you can tie the legs together with kitchen twine. This is mostly for aesthetics and helps the chicken hold a compact shape, but it's not essential for cooking.
- The Roasting Technique (Inspired by Experts):
- Place the seasoned chicken in the preheated 425°F (220°C) oven. Roast for 20-25 minutes. This initial high heat blast is key to kickstarting that beautiful golden-brown, crispy skin.
- After 20-25 minutes, reduce the oven temperature to 375°F (190°C) OR, for an even gentler cook, turn the oven OFF entirely. The residual heat in the oven will continue to cook the chicken slowly and evenly without drying it out. If using the "oven off" method, leave the chicken in the turned-off oven for another 30-40 minutes for a 4-pound bird. If using the reduced heat method, continue roasting until done.
- Check for Doneness:
- This is where your instant-read thermometer becomes your best friend. Insert the thermometer into the thickest part of the thigh, avoiding the bone. The USDA recommends a minimum internal temperature of 165°F (74°C) for safety. For texture, breast meat is perfectly juicy at 165°F, while dark meat (thighs and drumsticks) benefits from reaching 180-185°F (82-85°C) for optimal tenderness and flavor.
- A 4-pound chicken will typically take about 1 hour total (including the high-heat start and the residual cook time) to reach these temperatures, but always cook to temperature, not just by time alone.
- Rest and Serve:
- Once the chicken reaches the desired internal temperature, carefully remove it from the oven and transfer it to a cutting board. Tent it loosely with foil and let it rest for at least 10-15 minutes. This crucial step allows the juices to redistribute throughout the meat, ensuring every bite is moist and flavorful. Skipping this step leads to dry chicken!
- Carve, serve, and enjoy your perfectly cooked simple whole roasted chicken!
Troubleshooting & Pro Tips for Success
Common Questions & Solutions:
- My skin isn't crispy! The most common culprits are insufficient drying of the skin, not enough fat (butter/oil) applied, or the oven temperature wasn't high enough initially. Ensure your chicken is bone-dry before seasoning.
- My chicken is dry! This almost always means it was overcooked. An instant-read thermometer is your absolute safeguard. Remove the chicken as soon as it hits the target temperature. Also, remember to rest the chicken!
- What if my oven cooks unevenly? If your oven has hot spots, consider rotating the roasting pan halfway through the cooking process.
Pro Tips for an Even Better Roast:
- Brine or Dry Brine: For an extra juicy and flavorful bird, consider a simple dry brine (salting the chicken 12-24 hours in advance) or a wet brine. This isn't necessary for delicious results with this recipe, but it's a fantastic upgrade.
- Pan Gravy Perfection: Don't let those flavorful drippings go to waste! After removing the chicken, place the roasting pan on the stovetop over medium heat. Add a splash of broth or white wine, scraping up any browned bits from the bottom. Whisk in a cornstarch slurry (1 tbsp cornstarch mixed with 2 tbsp cold water) and simmer until thickened. Season to taste – a simple, quick gravy that elevates the entire meal.
- Add Root Vegetables: For a complete one-pan meal, toss chopped carrots, potatoes, onions, or parsnips with olive oil and seasonings, then arrange them around the chicken in the roasting pan for the last 45 minutes of cooking. They'll absorb the chicken's juices and become wonderfully tender.
- Experiment with Herbs: While Italian seasoning is great, don't hesitate to experiment. Fresh rosemary, thyme, and sage are classic choices that pair beautifully with chicken.
Once you've mastered this classic, why not try our Perfect One-Hour Roasted Chicken: Better Than Rotisserie recipe for another fantastic twist, or even venture into spatchcocking for faster cooking? The world of whole chicken roasting is yours to explore!
Conclusion: Your Culinary Triumph Awaits
Roasting a whole chicken doesn't have to be an intimidating task. With this comprehensive guide and the understanding of a few key principles – proper drying, generous seasoning, critical temperature monitoring, and essential resting – you are now equipped to create an extraordinary meal. This simple whole roasted chicken recipe promises crispy, golden skin and unbelievably juicy, tender meat every single time. It's healthy comfort food at its finest, easy enough for a weeknight, yet impressive enough for a special occasion. So, preheat your oven, grab your bird, and get ready to enjoy the rich rewards of homemade perfection.
